In a previous post, we spoke about different types of hostings, and we’ve created our first droplet (VPS) at DigitalOcean. Now I’ll show you how to install LEMP (Nginx, MySQL, and PHP) stack on VPS within few minutes and fully automatically.
As you may know you can install LEMP stack one by one. You install and configure Nginx, then MySQL, then install php5-fpm and php5-mysql modules and configure Nginx to use them. What if you can do all of this with few commands from your shell? The solution is the automatic install script. There are many automatic install scripts available. Most of them are OS-specific, e.g. for CentOS there is Centmin. For Debian and its clones, there is solution named EasyEngine. EasyEngine (ee) will install all necessary software for you (Nginx, MySQL, PHP as well as HHVM, PageSpeed, postfix, mysqladmin)
EasyEngine is currently compatible with:
- Ubuntu 12.04 & 14.04
- Debian 7 & 8
So move on…
1. Before we start
In the first step, we have to check if there is Apache installed on our VPS. If so, we have to remove it first. I prefer Nginx over Apache because it uses much less RAM as well as it’s noticeable faster especially when it comes to serving static files. If you still want to keep apache (for any reason) you have to either stop it or reconfigure it to use the different port. I suggest you to uninstall it completely with following command:
sudo apt-get remove apache2*2. Install EasyEngine
Now we can start to install EasyEngine.
wget -qO ee rt.cx/ee && sudo bash ee
Sometimes you can experience some common problems because of missing packages. If so, use the command bellow. This will install all necessary packages. BTW: I didn’t experience this issue with the DO Ubuntu 14.04 image, however, you can experience this with some other OS images e.g. minimal installs used by RamNode.
apt-get install curl libcurl3 libcurl3-dev git bc
If you installed EE you can start to edit its config file with following command (I just prefer nano over vim 😛 )
nano /etc/ee/ee.conf
Everything in the config file is well documented and straightforward. I’ll just mention a few things here you may consider changing.
In the “WordPress” section, you can see few parameters your can change. I suggest to change:
- User: this parameter is used to set your administrator account name. If you do not enter anything here EE will create administrator account with name “admin”. This is dangerous. Why ? Because most of the brute force attacks use “admin” for the administrator account name.
- Password: this parameter is used to set your administrator password. If you do not enter anything here EE will create a random password for you. I prefer to set this to my own password as autogenerated one is quite hard to remember. If you use password manager you can leave this blank and use autogenerated one.
3. Install LEMP stack + your first WP site
And now the magic comes in. With the single command, we will install Nginx, MySQL and PHP as well as our new WordPress site. Run the following command:
sudo ee site create example.com --wpThe command above creates WP site with no cache enabled.
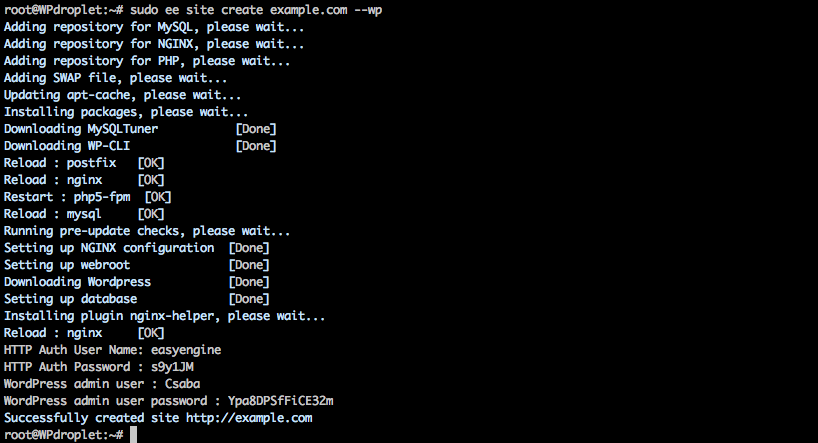
[tip color=”lightgreen”]Note: EasyEngine will create a swap file (on KVM based VPS). Its size is based on the size of VPS RAM.[/tip]
EE supports many other types of WP sites. Here they’re:
Standard WordPress Sites
ee site create example.com --wp                  # install wordpress without any page caching
ee site create example.com --w3tc                # install wordpress with w3-total-cache plugin
ee site create example.com --wpsc                # install wordpress with wp-super-cache plugin
ee site create example.com --wpfc                # install wordpress + nginx fastcgi_cache
It is important to mention here that EE won’t configure cache plugins for you. It’ll just install and activate them.
WordPress Multisite with subdirectory
ee site create example.com --wpsubdir            # install wpmu-subdirectory without any page caching
ee site create example.com --wpsubdir --w3tc     # install wpmu-subdirectory with w3-total-cache plugin
ee site create example.com --wpsubdir --wpsc     # install wpmu-subdirectory with wp-super-cache plugin
ee site create example.com --wpsubdir --wpfc     # install wpmu-subdirectory + nginx fastcgi_cache
WordPress Multisite with subdomain
ee site create example.com --wpsubdomin            # install wpmu-subdomain without any page caching
ee site create example.com --wpsubdomain --w3tc     # install wpmu-subdomain with w3-total-cache plugin
ee site create example.com --wpsubdomain --wpsc     # install wpmu-subdomain with wp-super-cache plugin
ee site create example.com --wpsubdomain --wpfc     # install wpmu-subdomain + nginx fastcgi_cache
Non-WordPress Sites
ee site create example.com --html     # create example.com for static/html sites
ee site create example.com --php      # create example.com with php support
ee site create example.com --mysql    # create example.com with php & mysql support
HHVM Enabled Sites
HHVM (HipHop virtual machine) was created by Facebook engineers to save resources on Facebook servers. It’s much faster than any current version of PHP. Seems to be even faster than upcoming PHP version 7.
[tip color=”lightgreen”]Note: HHVM requires 64bit OS to be installed. More information about HHVM you can find here[/tip]
ee site create example.com --wp --hhvm           # create example.com WordPress site with HHVM support
ee site create example.com --php --hhvm          # create example.com php site with HHVM support
PageSpeed Enabled Sites
EE also supports pagespeed module created by Google. It helps you to improve your PageSpeed rank automatically. For more information click here.
[tip color=”lightgreen”]Note: PageSpeed module can be CPU intensive sometimes. I suggest you to test it before you make this change on live server[/tip]
ee site create example.com --wp --pagespeed      # create example.com WordPress site with PageSpeed support
ee site create example.com --php --pagespeed     # create example.com php site with PageSpeed support
In the next post, I’ll show you some useful EE commands you need to know to manage your WP sites and the status of the EE stack.
About The Author
Csaba Kissi
I'm entrepreneur, creative web developer who loves Wordpress, PHP, MySQL, Litespeed, Nginx and likes to discover new techniques.