If you install your new WordPress site there are three main hosting solutions available for you. You can go either with shared, VPS (virtual private server) or dedicated hosting. I won’t mention cloud here as it’s a hybrid solution.
It could be a dilemma here which one is right for you. This is not a question for me and I’ll describe why later in this post. Each of hosting types has its cons and pros of course. I’ll mention just a few of them.
Shared hosting:
Pros:
- Cheap
- Easy to configure (most of them offer one-click WP install)
- Easy to maintain your common tasks (most of them use Cpanel)
Cons:
- Worst performance (suitable for small/medium websites)
- You cannot configure the hosting environment (choose/tune web server, MySQL server and so on)
- No or limited flexibility for your custom tasks
VPS:
Pros:
- Cheap
- Much better performance in compare to shared hosting (suitable for medium/larger websites, even large sites can run on VPS after fine tuning)
- Great flexibility. You can do almost all things you can do on a dedicated box.
- You can fully configure your entire hosting environment (install/tune/test web server, MySQL server and so on).
Cons:
- The performance is not as good as on the dedicated box (not always, best VPS hosting providers can easily outperform budget dedicated boxes).
- You usually get less RAM and CPU power in compare to a dedicated box.
- You need server management skills (if you use unmanaged solution)
Dedicated server:
Pros:
- The best performance (not always, best VPS hosting providers can easily outperform budget dedicated boxes)
- Great flexibility. This server is yours so you can do anything (or almost anything :)).
- You can fully configure your entire hosting environment (install/tune/test web server, MySQL server and so on).
Cons:
- Most expensive solution.
- You have to pay extra money to get e.g. two hard drives, SSD drives, HW RAID.
- You need server management skills (if you use unmanaged solution)
Now if you read all Pros and Cons it can be a bit confusing. What the hell? Which one is the best for me?
Let’s imagine you’re running a WordPress site with 1000 uniques/day and need proper hosting. If you’ve no experience with server management the answer would be probably simple for you. You’ll choose shared hosting because there is no need for server management.
For those who’re ready to learn or have some server management skills, I would recommend choosing VPS. Why ? Because you’ll get much more flexibility, scalability, and power. If you’ll go with VPS you’ll get good performance with the flexibility you can’t achieve with a shared solution.
There are many VPS providers however you want the best service possible 🙂 I personally used about 10 VPS providers already and can easily compare them. So here is my list of Top 3 VPS providers:
Don’t ask me which one is the best as all of them are great providers and everyone can offer something outstanding, e.g. RamNode – great performance and uptime, DigitalOcean – snapshots, Vultr – startup scripts. All three are using SSD drives in RAID10 and are very reliable VPS hosting providers with thousands of customers.
There is one important thing you have to consider. There are three most widely used virtualization solutions used by VPS providers:
- OpenVZ
- KVM
- Xen
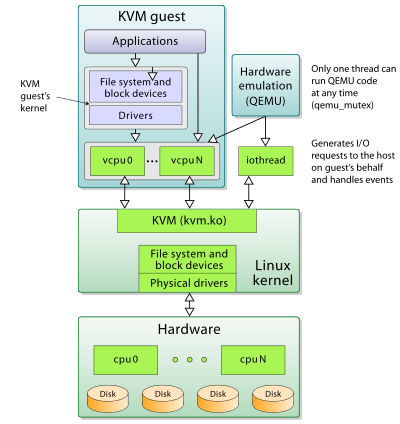
I don’t want make the extensive comparison here as this post is about something else. Anyway… The main difference is that OpenVZ based VPS shares kernel with all other VPSs located on the same node. KVM based VPS uses its own kernel. What does it mean?
In generalKVM boxes are more secure unfortunately they’re using more RAM because of the kernel. OpenVZ uses less RAM because of the shared kernel. There is also difference between resource allocations. e.g. OpenVZ has ability to’Burst’ RAM and other extra resources available when nodes are underused. Xen resources (RAM, etc) are fully dedicated and private.
[tip color=”lightgreen”]TIP: If you want to save some RAM go with OpenVZ VPS. Unfortunately only RamNode offers OpenVZ.[/tip]
I personally use RamNode for my WP sites just because of OpenVZ support and the VPS performance I measured before I made my decision.
In this tutorial, I’ll use DigitalOcean. If you’re interested in some speed tests I made the extensive review of DigitalOcean and you can check it here.
[tip color=”lightgreen”]TIP: DigitalOcean and Vultr offer hourly billing so you can simply sign up, play and try features yourself[/tip]
DigitalOcean (DO) intro:
DigitalOcean was primarily created for web developers and for development purposes. Why ? Here is the list of main features. Read it and you’ll see why 😉
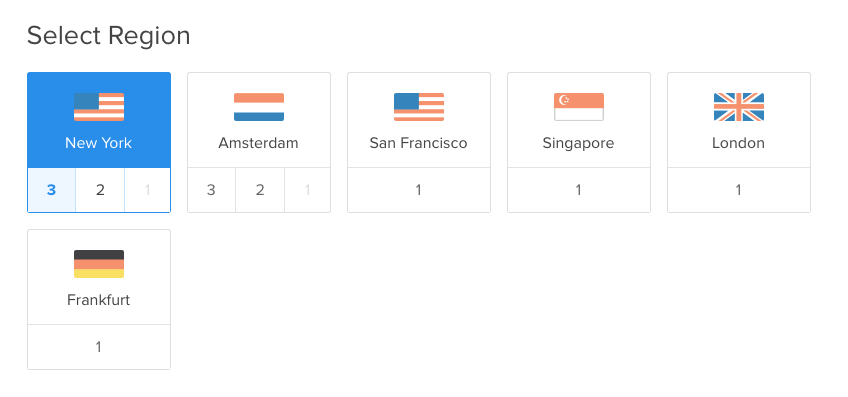
- 6 locations to choose from (New York, San Francisco, Singapore, London, Frankfurt, Amsterdam).
- SSD drives in standard config.
- User-friendly Control Panel.
- IPv6 (not very important for most users).
- Hourly billing.
- Very flexible (upgrade/downgrade).
- Ability to move between locations.
- Backups.
- Snapshots.
- SSH keys.
- DNS.
- Private network.
- 1Gb/s connection.
- API.
A lot of webmasters decided to use DO as their live hosting because of the features they offer.
Step 1: Create your VPS (Time required: 90 seconds)
In the first step, we’ll create our VPS. First you have to create your account with DigitalOcean. You can use my affiliate link to sign up. With this, you’ll get $10 starting credit to your account.
Enter your email and password and click “create account” button. Now it’s time to create your VPS. After the successful login, the following screen will appear. Click “Create Droplet”

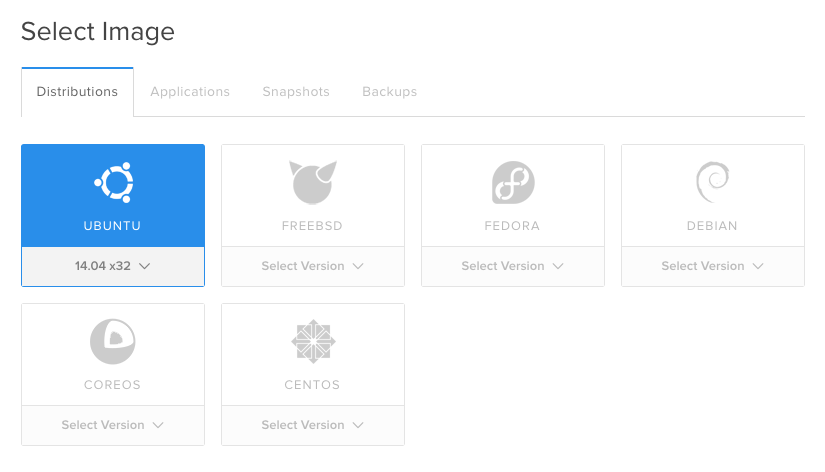
Enter the hostname for your droplet. It can be anything you want. I prefer to use a name that describe the sites used on the server, e.g.myblog.vps1. In this example, I’ll enter WPdroplet.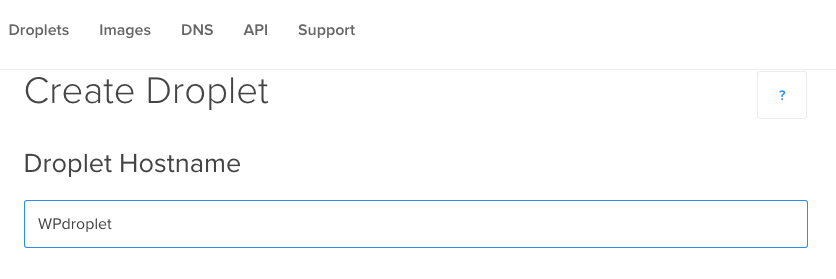 Now select your preferred Linux distribution. We’ll select Ubuntu 14.04 x32.
[tip color=”lightgreen”]TIP: Please keep in mind that 32bit versions use significantly less RAM than their 64bit equivalents. Check this article where I’ve compared distributions offered by RamNode for the RAM usage[/tip]
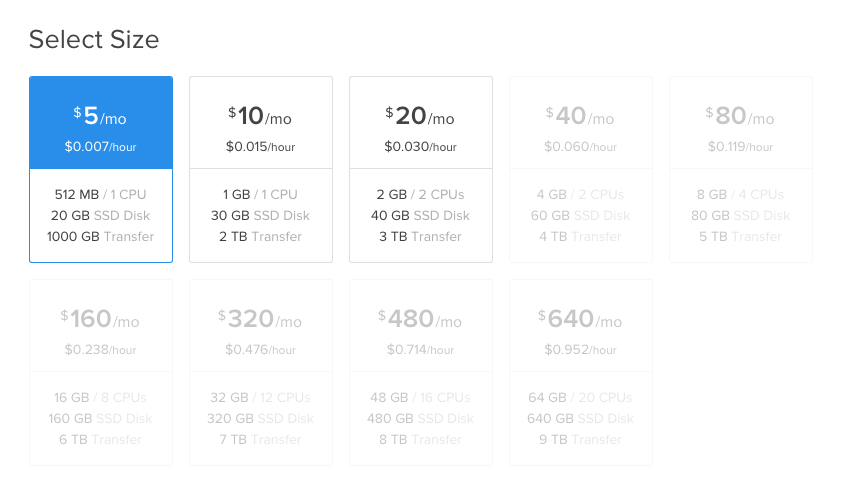
Now select the size of your VPS. You can select from 9 predefined sizes. The smallest one is VPS with 512MB RAM, 20GB SSD disk, and 1 CPU which will cost you $5/month. The largest one is VPS with 64GB RAM, 640GB SSD disk, and 20CPU. We’ll select the smallest one for our new VPS.
[tip color=”lightgreen”]TIP: Don’t worry, you can upgrade later if your traffic will reach the sky :)[/tip]
We can now select the location of the VPS. There are 6 locations available now. They’ve added Frankfurt recently.
[tip color=”lightgreen”]TIP: Always choose the location in your preferred region, e.g. if you target east coast US visitors then use New York [/tip]
There are few more settings available for you. You can enable private networking or backups (this option will raise your monthly price by 20%).

You can also add SSH keys to the newly created VPS so it won’t prompt you for the password when you access the VPS via SSH. More information about generating SSH keys can be found here.
[tip color=”lightgreen”]TIP: I strongly recommend you to generate your SSH keys and enter them to the DO system. It’ll save you some time during login as well as it adds more security to your VPS[/tip]
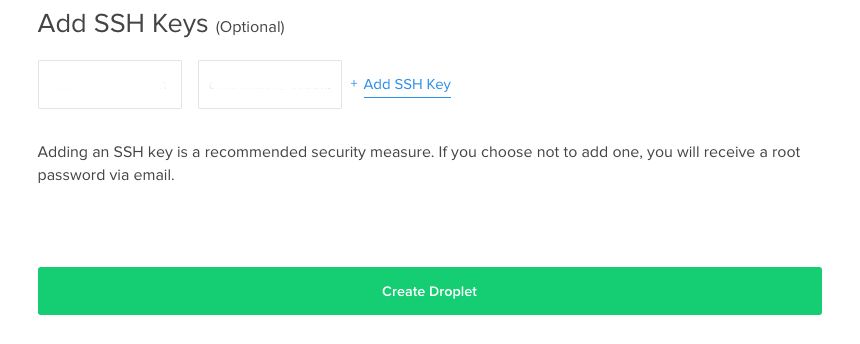
Now click “Create Droplet” and the system will start to create your droplet. It usually takes less than a minute to generate it.
In the next part, I’ll show you how to install LEMP (Nginx, MySQL, PHP) stack which will power your WP site as well as WordPress. And all of this fully automatically within few minutes 😉
Stay Tuned !
About The Author
Csaba Kissi
I'm entrepreneur, creative web developer who loves Wordpress, PHP, MySQL, Litespeed, Nginx and likes to discover new techniques.
Nice article, explains clearly how to setup a VPS, thanks for sharing!!